FLOWER BLUE


    HeLLo lovelies!


    The other day I went out and found new nail polish (new for me coz I haven't that piece in my collection LOL~) from Organic Farm. It has a little blue flower shaped glitters to it and it looks just so adorable! And because I am a huge lover of glittery bling-bling nail polishes I grabbed it right away!


    Image and video hosting by TinyPic


    PRODUCTS USED:


    Smart Enamel Nail growth Stimulator


    The Face Shop Face & it BL601


    The Face Shop Lovely Me:ex BL602


    The Face Shop Face & it Shimmer Top Coat


    Flower fimo and sponge


    Image and video hosting by TinyPic


    HOW TO DO:


    1. Apply main light blue base color.


    2. Sponge diagonally sky blue color.


    3. Randomly put on dark blue and light yellow n.p. with a sponge as well.


    4. Seal everything with a blue glittery n.p.


    5. Put on blue flower fimo and finish of with a shimmer top coat.


    Sorry for bad quality pictures, I took them at night time...


    Thats it for now! Thanx for looking and have a great weekend!

FIMO STICKS + CITRUS NAIL DESIGN


    HeLLo everyone! Hope U are aLL doing great!


    I really do ♥ all type of nail decoration things! Because it is easier to decorate ur nails with something else if u are not so good at freehanding as I do. Honestly I like to use nail stickers and all such things to decore my nails more than painting with a brush or make a stamping art. It is all still hard for me to do. So, I found another way to make a nail art look cute is a fimo sticks or U can find them in a fimo slice wheels.


    A ton of diffrent forms of fimo sticks available on Born Pretty store and there is a lot of random designs like a flowers, fruits, play boy, cup cakes, Channel - Dior - Louis Vuitton logo, even Hello Kitty FIMO STICKS. It is so cute, coz I got mine 100 pcs Cane Nail Art Fimo and I can't stress enought how I am happy :D 


    Image and video hosting by TinyPic


    The description of Born Pretty says: "The set includes 100 most popular fimo as shown in the picture. You will get butterflies, flowers, fruits, leafs, tidy bear, heart, kitty face ..... exactly the same items as you see in the above picture. The length is 50-55 mm. The diameter is 3-5 mm. How to use? Cut the nail art fimos into thin or thick pieces as you like, and glue them on your nail. Sutiable for personal or professional use. Tips: You can tell us the pattern you are interested in.(allow the pattern which is not in the pictures.) We will try our best to find it to you."


    Image and video hosting by TinyPic


    To cut my fimos I'm using just a thin cutter, nothing special, there is no need buying anything professional!!


    Image and video hosting by TinyPic


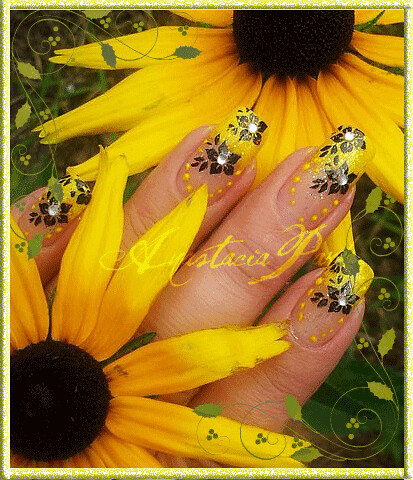
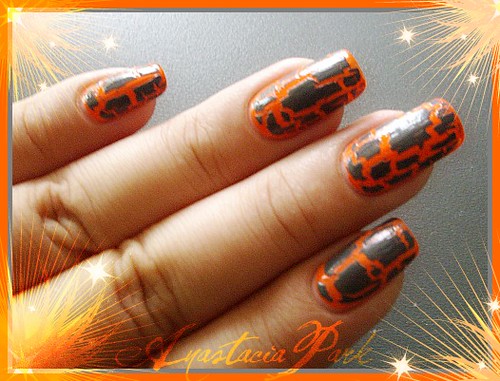
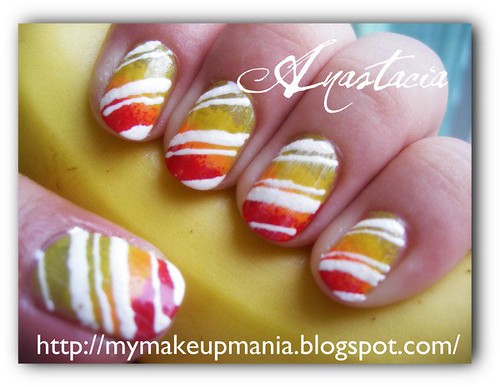
    Here I made a Citrus nail design using the fimos. I like how look my nails. Just keep looking at them all the time :D LOL~


    HOW TO DO:


    1. Apply base coat polish at first. Then apply a coat of yellow glitter jelly nail polish.


    2. With a yellow and orange acrylic paint make some gradient nail tips.


    3. Apply one more coat of yellow glitter jelly polish and put on citrus fimo slices.


    4. Randomly put on green beads. Seal everything with a top coat and DONE!


    PRODUCTS USED:


    The Face Shop Nail Pleasure collection in Whitener (as a base)


    Emily n.p. #2 (for a glittery yellow jelly) 


    Acrylic paints in Lemon Yellow and Vermilion Hue


    Green beads, fimo slices


    VoV Gel Coat ( as top coat)


    Image and video hosting by TinyPic Image and video hosting by TinyPic


    Quick Tip: Fimo slices looks flat on ur nails when U cut them as thin as U can. Just a few mm.


    Quick Tip: To stick fimo slices use more thickened (clear) nail polish. A minute after application press down all over fimo slice. It is recommended to seal with top cote! 


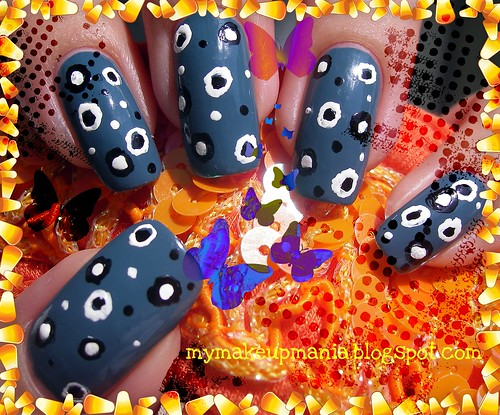
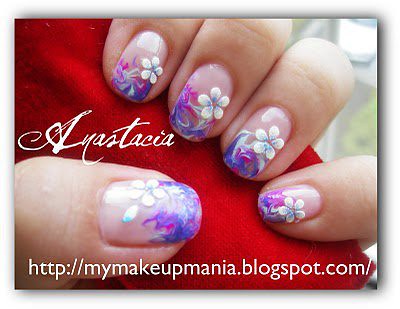
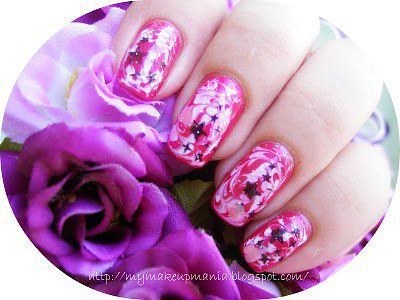
    Here is more nail design ideas for using fimo slices :)


    "FLOWER BLUE"


    Image and video hosting by TinyPic


    "FRUITS"


    FRUITS


    I can give  for sure!!! One fimo stick will last U for a very-very long time and it's such a great product to decorate ur nails!


    Definately check out http://www.bornprettystore.com/ and order some for yourself. Also U can use my cupon code below for 10% off.


    Thats all! Thanx for looking and have a great day!


    This product was sent by BornPretty store.


    Image and video hosting by TinyPic


    P.S. Summer Inspired contest is closed now! I will post all the entries in my next blog update! It'll be comment voting btw! Good luck to everyone!

Vampy Red


    HeLLo everyone! I am already back from my short summer vacation and if U'd like to see some of my personal pictures go to the NAILSTORY fan page :D I posted a few pictures there.


    The other day I've did such a red vampy mani for my nails :) I really really like this a lot because combination of red white and black is totally my taste!


    HOW TO DO:


    1. Apply a base coat. After that apply 2 coats of ur true red nail polish.


    2. Apply red glitter on top of ur red color.


    3. With a piece of sponge apply creame white nail polish on ur nail tips.


    4. Draw some animal print stripes with a black nail art pen.


    5. Seal everything with a clear top coat and U are done!


    Image and video hosting by TinyPic


    PRODUCTS USED:


    FRENCHI NAIL GROWTH STIMULATOR (as a base coat)


    BW Nail Coctail kit in "red"


    Catherine Arley #724 (for red glitters)


    The Face Shop Lovely Me:ex collection nail polish in WH001 (for the white tips)


    Aritaum Two Way Nail Pen in Black (for the stripes)


    Aisai clear nail polish (for the top coat).


    Image and video hosting by TinyPic


    Thats it for now :) Thanx for looking and have a great day :D

NOTD: PANDA BEAR


    HeLLo everyone! Hope U are all doing great! Just want to say a big thanx for all ur sweet comments and for supporting me and my blog all the time! Very do appreciate it!


    And today I want to share one of my previous nail designs :) It's a cute panda bears water slide decals I've used. My mom bought to me whole set of such cute things :) I'll do more water slide decals nail design for U :)


    Also tomorrow I'm going with my family to the 남해 (South Sea) beach for our summer vacation. I'll be there for 3 days :) Yay! very exciting :)


    "PANDA BEARS" 


    Image and video hosting by TinyPic


    Also recently I've bought just a few new things from The Face Shop as always. I found matte yellow nail polish and glittery nail polishes as well. Got some nail polish remover which is my all time fave nail polish remover, nail art stickers and got hand cream, make-up pouch (loveeee that blue color), cotton pads as a service a.k.a. freebies :)


    New Prorance Cracking nail polishes...


    Image and video hosting by TinyPic


    Thats all for now! I'll be back next week :)


    Thanx for visiting and take care :)

Happy Butterflies


    HeLLo everyone! Just a quick reminder for a contest which is already have started. If U are interesting just click this picture on the right corner and it will take U there :) Hurry up! It ends at July 26!


    Anyways, here is my NOTD I did recently. Just played with some bright colors and funny nail stickers :D


    Image and video hosting by TinyPic


    HOW TO DO:


    1. Apply a base coat at first. After that apply light yellow nail polish on half of ur nail using a sponge.


    2. Right after that apply pink nail polish slightly lower and lastly apply a purple color on the very tip of ur nail. 


    3. Put on some butterflies and seal everything with a shimmer top coat. DONE!


    on day light...


    Image and video hosting by TinyPic


    And the other day I bought a new nail polish from The Face Shop as always LOL~ I can't help myself and stop buying their nail polishes coz I love them so much! I really do like a texture and consistency of them. As well as color range is so nice too! Also the store is located near my home and I am very easy to go more often than in other places :)


    The Face Shop Lovely Me:ex collection in PP 402.


    Just a very beautiful deep purple color with a lot of silver and violet glitters to it. Applies very nice and opaque even in one layer.


    I also added some 3D glitter stickers on my nails for more fun look.


    Image and video hosting by TinyPic


    Thats it for now! Thanx for looking and take care!

GOLDEN ROSE


    HeLLo everyone! This is my recent mani I've did a long time ago. It was winter time, yeah... LOL~ And because of that this design looks as for winter inspiration :P And while I was in my native place, I found such a nice nail polishes it called Golden Rose polishes. Yes, they are very-very cheap but some of their colors could be so amazing and beautiful! And one of such pieces own my sister. It is a nail polish from her collection she gave me to try it out :D And I liked it a lot. Very nice and smooth application. But the only drawback with this products they are not long lasting and if U wearing a nice top coat it'll be works as great!


    Image and video hosting by TinyPic


    PRODUCTS USED:


    1. Nail Growth Stimulator as a base coat.


    2. Golden Rose nail polish # 113.


    3. The Face Shop Lovely Me:ex nail polish in BL 602.


    4. The Face Shop Lovely Me:ex nail polish in WH 001.


    5. Golden Rose nail polish # 111.


    6. The Face Shop Face & it shimmer top coat # 05


    7. Sponge and 3D flower nail sickers.


    HOW TO DO:


    1. Apply a base coat and wait until completely dry. Then apply shimmer/glitter silver nail polish as a main background color and wait until completely dry.


    2. With a tiny piece of a sponge apply some of a blue nail polish on nail tips as "V" shape. Add a bit of a white color on top of it.


    3. After all thats dry apply a clear polish with a lots of rainbow glitters to it and wait until dry.


    4. Add some flower 3D stickers and finish up with a shimmer top coat. DONE!


    Image and video hosting by TinyPic


    GOLDEN ROSE nail polish #113. Application in 2 coats. Applies very smooth and looks just awesome :)


    Image and video hosting by TinyPic


    Thats it for today! Just wanted to share nice and cheap nail polish I found LOL~


    Thanx for looking! Have a great day everyone!

Catherine Arley


    HeLLo everyone! Just another quick update for one of my lemming nail polishes. I really wanted a color kindda pale yellow with a slight tinge of salad green LOL~ And when I stayed at my mom's place I finally found a similar one. It is CATHERINE ARLEY nail polish #706. It has a pretty nice texture, dries normal and applies very smoothly. I like it a lot :D


    Image and video hosting by TinyPic


    I also made a nail design using this nail polish as a main background color. Just sponged white strip along the nail plate and added a bit of yellow on top of the creame white. Also I draw some black stripes as a tiger print. Sealed everything with a clear top coat and done!


    Image and video hosting by TinyPic


    Here is my "LOVE" lol~ So glad I bought this nail polish :)


    Image and video hosting by TinyPic


    Thats all for today. Thanx for looking everyone!


    Have a nice weekend :)

ACRYLIC PAINT NAIL ART DESIGNS


    Hello everyone! I just came home and I can not get over it LOL~ For the last few days it is such a crazy heat and humidity out there! I really feel like I am a hero of "LOST" hahaha~ Always stuffy and sweaty body, kindda hate summer. I spent nice time with my mother-in-law today. We visited a hair salon where my sister working, ate a potato pizza and talked a lot

    about nothing... Kindda relaxing day :D


    Anyways, while my little son sleeps and I have nothing to do right now I decided to share my current manis using an acrylic paints. I have 2 different kits tho. My first kit made in Russia is oil based and the second one I already bought over here and I think it's a water based acrylic paint.


    Here is my mani I wear for now. For this mani acrylic paint part is a white stripes and black lines as well. Kindda animal print on gold background LOL~ I used Skin Food nail polish in Sparkled Sand for the main color and topped it with a gold flat glittery polish.


    Image and video hosting by TinyPic

    Here is my sister's hands. I made this mani for her the other day. Also using acrylic paint. Totally don't know what happened to my camera coz it take a blurry pictures :( Have to play with a different lightings...


    Image and video hosting by TinyPic


    Here is the RUSSIAN GLINKA I've made for my sister using that oil based acrylic kit.


    Image and video hosting by TinyPic


    Skin Food  nail polish in Sparkle Sand


    Image and video hosting by TinyPic


    Skin Food nail polish in Red Stone.


    Image and video hosting by TinyPic


    Thats it for now. Thanx for looking and have a great day!

GUEST POST: "MY MODEL HANDS"


    HELLO lovelies! Hope U are all doing great! As for me that is I swallowed a stronger wave of inspiration! Totally drugged with nail art things, nails, buying more and more nail stuff, some gadgets for manicures and pedicures! I really like feeling as I do now because it is kindda my thing. It is so interesting thinking about different nail art designs, styles, colors, making ur own creative stuff and do exactly what you like :D Never felt so awesome and inspired! ALSO seeing me so into nails 'n stuff my sister turned into this too LOL~ I am so happy that I have someone nearby who shares similar interests and rush to the same - to create a beautiful, improves best mood every day :)


    Staying at my mom's place I've did a lot of manicures for different people! Yes! I finally have tried doing a nails for someone else :) It is such a great experience! Because honestly I like to see at people happy with my work and their hands LOL~ This is a very positive feeling :D Most of all time my hands model is my sister's nails. She has a long nails and as well as she absolutely like to play around some bright colors and try something unusual. And here is some of her nails made by me.


    "COLORFUL ABSTRACT" 


    For this mani I've used all nail art polishes ( nail polishes with a long and thin brush ) I have LOL~ I just bought those at that time and really wanted to play with them. 


    Image and video hosting by TinyPic


    "LATE SPRING"


    For this design I've used a sponge technique and yellow, orange and green nail polishes. Some 3D stickers and flat rhinestones nail polish.


    Image and video hosting by TinyPic


    "COOL GIRL"


    Image and video hosting by TinyPic


    THE FACE SHOP nail design.


    Image and video hosting by TinyPic


    "SPONGED FRENCH"


    Image and video hosting by TinyPic


    And here is a mani Elena did by herself :D She don't like giving a names to her designs but anyways, just a blue nail tips kindda frozen look.


    Image and video hosting by TinyPic


    Thats all for now! Thanx for looking! Have a positive great day everyone!

The Most Dearest hands in The World


    Hey everyone! Whose hands the most dearest hands in the world? Of course this is mother's hands :)


    My mom has always been for me an ideal of beautiful hands and nails. Ever since I can remember she has always had excellent long and healthy nails with rounded shape and polished in pink pearl nail polish :) My mom exactly got me into growing nails at 5th grade. Because I was always biting my nails at the very root and I could not help myself. But the desire to have long and beautiful nails finally won! And after that I faced with another problem my nails were fragile and peeled off. So my mom told me to apply iodine dialy on my nails. And after some time my nails are healthy grow :D


    When I speak of my mom I miss her even more. For a last few months I stayed at my home place and I had a great chance to make some nail designs for my dearest hands in the world!


    ZEBRA PRINT FOR MATURE HANDS AND TOES.


    Mani and Pedi 


    HOW TO DO FOR NAILS:


    1. Apply a base coat at fIrst. After that apply 2 coats of silver holo nail polish.


    2. With a tiny piece of a sponge apply diagonally white creame polish on nail tips.


    3. Draw some black stipes with a nail art polish only on white sponged area.


    4. Make some white dots on the white edge and seal everything with top coat.


    DONE!


    HOW TO DO FOR TOES:

    1. Apply base coat if you are, coz my mom do not wearing base coat polish for her toes and I am.

    2. Apply 2 coats of matte white nail polish and wait 'till completely dry.

    3. Draw a zebra print with a black nail art polish and seal evrything with matte top coat.

    DONE!


    The most dearest hands in the world


    Here is another mani I've did for my mom. I call it MODERN FRENCH.


    HOW TO DO "MODERN FRENCH":

    1. Apply whitening base coat polish.

    2. Take a sponge and apply creame white nail polish on nail tips and wait 'till completely dry.

    3. After that apply clear glittery polish (1-2 layers it's up to U) on top of everything.

    4. Draw some white and glittery blue stripes and finish with a shimmery top coat.

    DONE!


    Modern French style nail tips


    Thats all for now. I am very sorry that I have not had a chance to do a lot of other designs for my dearest hands in the world.


    Thanx for looking and have a great Sunday everyone!

HELLO KITTY STAMPING NAIL ART KIT


    HeLLo everyone!! How is ur weekend goes? It is so rainfall here in Korea lol~ I can't even open my windows :D And just sitting at home in front of the screen and try to share my wonderful experience ;)

     Despite the fact that Konad made ​​in Korea brand - it is very difficult to get their products over here. So untill now I didn't used them BUT there is a very nice replacement of such nail stamping kits. And one of them are available on BORN PRETTY store.

    For all those people who like designing nails it is such a nice way to create a beautiful manicure by yourself. It is pretty easy to do a nail designs with this kit because it includes everything u need.

    Hello Kitty & Floral Stamping Nail Art Kit includes:

    2 pcs metal plate

    3 pcs nail stamp polish

    1 stamper and 1 scraper

    Color of the nail polish: Red, Green, Dark Blue.


    Image and video hosting by TinyPic


    By the way, with this nail art stamping kits u can designing not only ur nails. As well as U can decorate ur cell phone and more other hard surfaces. 


    Those image plates are excellent quality. Every single design turns out perfectly. What I can't say about special polishes in the kit. I kindda tried to use them a few times already but seems like a texture is very fluid for this purpose. So I've used different s.p. from this kit.


    Image and video hosting by TinyPic


    Special Polishes a bit closer


    Image and video hosting by TinyPic


    BORN PRETTY image plates B87 and B89. >_< my new babies :P


    Image and video hosting by TinyPic


    Here I made some designs with both plates :D I call this one "Born Pretty" using image plate B89 and sp in Black.


    HOW TO DO:


    1. Apply a base coat at first. After that with a tiny piece of sponge apply creame yellow only on nail tips.


    2. Apply yellow glitter jelly nail polish.


    3. Stamp a few black flowers and put a rhinestone on the center.


    4. Make a few dots with a dotting tool and yellow acrilic paint.


    5. Seal everything with a shimmer top coat and DONE!


    DO NOT forget to take off a plastic cover from image plates before use. And also u have to wipe off all the remains of nail polish afterwords. Lets keep our stuff clean lol~


    Born Pretty Born Pretty image plate design


    And here is another design using B87 ip and sp White.

    "CRACKED HELLO KITTY"


    Image and video hosting by TinyPic


    Overall I think it worth to try only those image plates. Do like them a lot!


    Use my cupon code for 10% OFF on http://www.bornprettystore.com/


    Image and video hosting by TinyPic


    The nail stamping kit was sent to me by Born Pretty store.

CRACKING POLISHES by THE FACE SHOP


    HeLLo everyone! A few days ago I bought some of The Face Shop nail polishes from their latest Cracking collection. On my local store there is available only 4 different colors in black, gray, blue and brown. I got three of them and just want to share my experience :)


    I used all of them and I like them all! Absolutely nice texture, applies very nice, smooth and in opaque layer. Cracks very - very good! If I could I will buy more of a different colors from this collection. Absolutely like how it cracks and looks on nails. If you have the opportunity to try out The Face Shop Cracking collection nail polishes DO NOT miss such great chance :D

    Image and video hosting by TinyPic


    Here I make swatches for those 3 polishes. For main background color I chose Barbie Pink creame nail polish. Cracking polishes has a matte finish after appying them on nails but you can make it look glossy by applying a top coat.

    Image and video hosting by TinyPic


    Here I made some nail designs using those cracking polishes:)


    ANGEL LIGHTS ANGEL LIGHTS Cracking Nails


    Cracking Nail Polish


    Cracking Nail Tips


    Cracking Nails Blue Cracking Nail Polish by The Face Shop


    Also I want to re-post some of my nail designs which I've lost on Picasa album!


     "POLKADOT"


    Polka Dot


    BABY BLUE


    Baby Blue


    "DRY MARBLING NAIL TIPS"


     DRY MARBLING NAIL TIPS


    "CANDY CANE"


     CANDY CANE


    STAMPING NAIL DESIGN BY THE FACE SHOP


     DRY MARBLING NAIL DESIGN


    Thats all for now! Thanx for looking :D


    Have a great day :D

Total Pageviews